Tuesday, November 28, 2017

Tangerine Bird Silhouettes


Swallow silhouette

The previous post, Brussels Sprouts Holiday Branch, featured a variety of bird silhouettes carved from tangerine peels for decoration. Here are the how-to instructions for making your own bird silhouette decorations, to be used on a Christmas tree or just hung in a window to brighten your day with their orange glow as the sun shines through. 

I cut my tangerines in half vertically because I end up with more useable peel surface that way. Once your tangerine is cut in half, use a spoon to remove the fruit inside and to scrape all (or at least most) of the white pith from the inside of the peel. Be gentle but firm. This is a learn-as-you-go technique, figuring out how to be gentle enough not to tear the peel, but firm enough so that you remove the pith.

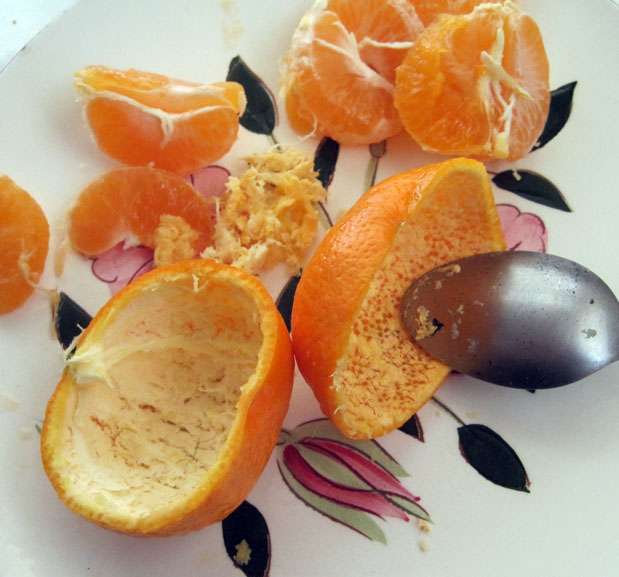
Scraping the pith from inside the peel

Either copy and print the image below, or download a printable PDF of this bird template sheet using this link: Tangerine Silhouettes.

Bird silhouettes: 8.5 x 11 sheet

The smaller silhouettes are suitable for use with tangerines; the larger silhouettes work well for use with oranges. Cut out birds, leaving a little space around each bird (you're not fine-cutting the silhouette yet). Glue each bird silhouette to a piece of tangerine peel using an ordinary old glue stick. This part of the process is a bit of a puzzle, shifting pieces around until you find a perfect fit between your silhouette and your section of tangerine peel.

Glueing silhouettes to sections of peel.

Use an X-acto knife with a clean, sharp blade to carefully cut out each silhouette.

Cut out silhouette using an exacto knife

Once you have finished cutting out your tangerine silhouette, simply wash off the paper and glue and pat the tangerine silhouette dry with a paper towel. At this point, use wire or thread and pierce a little hole in the top of your silhouette for hanging. You want to do this while the tangerine skin is still soft. Once dried, it will be brittle, hard, and difficult to do.

You have a couple of options for drying your tangerine bird silhouettes. I have found sand (available from any garden shop) works well, particularly when making tangerine boxes (another fun project you can find by following this link: Orange, Lemon and Lime Boxes). See example of bird silhouettes drying in sand below, but be aware that you want to completely cover the silhouettes with sand once you've placed them on the sand bed. 

Drying silhouettes using a bed of sand

Alternatively, you can press your silhouettes between several layers of paper towels, using a stack of books on top. Change the paper towels every few hours if using this technique. You want the end result to be totally dry and flat. Either the sand or press technique will take a couple of days. If you've dried them correctly, your decorations should last for several years.

Hanging owl silhouette

For an alternative, easier version of tangerine/orange decorations, try making star hangings: Idle Moments, Tangerine Stars.

Have fun, and enjoy the olfactory bonus as your home is suffused with the wonderful aroma of tangerines.

Wednesday, November 22, 2017

Brussels Sprouts Holiday Branch: Let the Revels Begin!


"Oh brussels branch, oh brussels branch..."

Here is a project that has been on my to-do list for years, ever since Trader Joe's began carrying veggie-laden Brussels sprouts branches as a holiday special just before Thanksgiving every year. The Brussels branch is a prime candidate for a new holiday tradition and of course, in the spirit of Thanksgiving, every element of the holiday Brussels branch is edible.

...how lovely are thy branches...

For those of you from around the world who don't celebrate this gluttonous holiday feast, feel free to incorporate the Brussels branch into your holiday festivities however you wish — as an alternative, edible Christmas tree, as a symbol of hope for the new year, as a pagan post for your Druid dances in the forest.

Tips and how-to advice:

• The upper, horizontal stalks provide supports for hanging decorations. The lower part of the branch remains solid sprouts.

• This holiday branch incorporates strung, fresh cranberries and bird silhouettes fashioned from tangerine peels. In less than a week I will be adding a how-to post to this blog about making your own orange and tangerine-peel silhouette decorations. You may, of course, decorate your own Brussels branch however you wish.

• The pot shown here has no holes on the bottom. It contains a little water to keep the branch fresh. More importantly, it contains a few big, heavy rocks to anchor the branch and offer it a little positioning support.

And now, enjoy some close-ups of my lovely Brussels branch and feel free to hum along to the classical holiday tune, "O Tannenbaum," substituting the phrase "Brussels branch" for "tannenbaum."


For truly dedicated revelers who are curious about how to go about actually eating their holiday branch once the festivities are over, here is a recipe for Cranberry Clementine Brussels Sprouts with Brown Sugar Glaze. Bon appétit - and stay tuned for the next posting on making orange and tangerine silhouette decorations. 

Wednesday, November 15, 2017

Advent Calendar Ball Gown 2017

Let the revels begin:

Advent ball gown for eight-year-old

Close-up

It is the time of year when I begin creating advent calendars, and this year's version is an interactive ball gown. Where is the ball? With the right attitude, the right gown, and the right accessories, the ball is wherever and whenever you say it is. The version above is for an eight-year-old recipient. The one below is for a six-year-old recipient. As this narrative progresses you will see the gowns unfurl.

Advent ball gown for six-year-old

Close-up

These gowns began with a search at the thrift store for promising "base" dresses - the wackier the better. Starting with size small dresses and armed with the recipients' measurements, I then took the dresses in to fit at waist, chest, and shoulders/armholes.  Note that the green dress above has a stretch torso, making fitting easier, but it was still taken in about two inches on each side.

The next step was to cut 25 sections of tulle, with each section comprised of two to three pieces of tulle. The tulle was attached at the waist of each dress. A little square of rough-cut cloth covers the top of each section of tulle, as shown below. This is brash, bold, we-don't-care-if-it-clashes sewing.

Anchoring down the top of each tulle section

A few ribbon embellishments adorned with bells or jewels were added to some of the tulle sections to add to the frivolity.

Each tulle section was then used individually to package a daily prize, including a chocolate coin (a yearly advent tradition) and a bead, in accord with this year's accessory theme. A few pieces of bling (rhinestone brooch, stick-on jewels) are included as occasional added treats. Tulle is wrapped around the objects at the bottom to enclose the contents, then rolled upward and tied off with a bow. Another little section of ribbon containing the date of the month is attached to each bow.

Loot bags, string, bling, beads and chocolate coins
The recipients each receive a loot bag along with their calendar at the beginning of the month. The loot bag includes instructions and two types of string for making jewelry. As they unwrap their beads each day, they stash them in their loot bags until they have enough to start stringing and making their own jewelry.

And here is what the gowns will look like on December 25, once all the little packages are open and all of the tulle is unfurled:

Gown for eight-year-old

Close-up

Close-up

Gown for six-year-old

Close-up

Close-up

One can only imagine the final splendor when the gowns are adorned with hand-crafted bracelets and necklaces. As a young man in San Francisco once told me: "Accessories are everything."
Related Posts with Thumbnails